
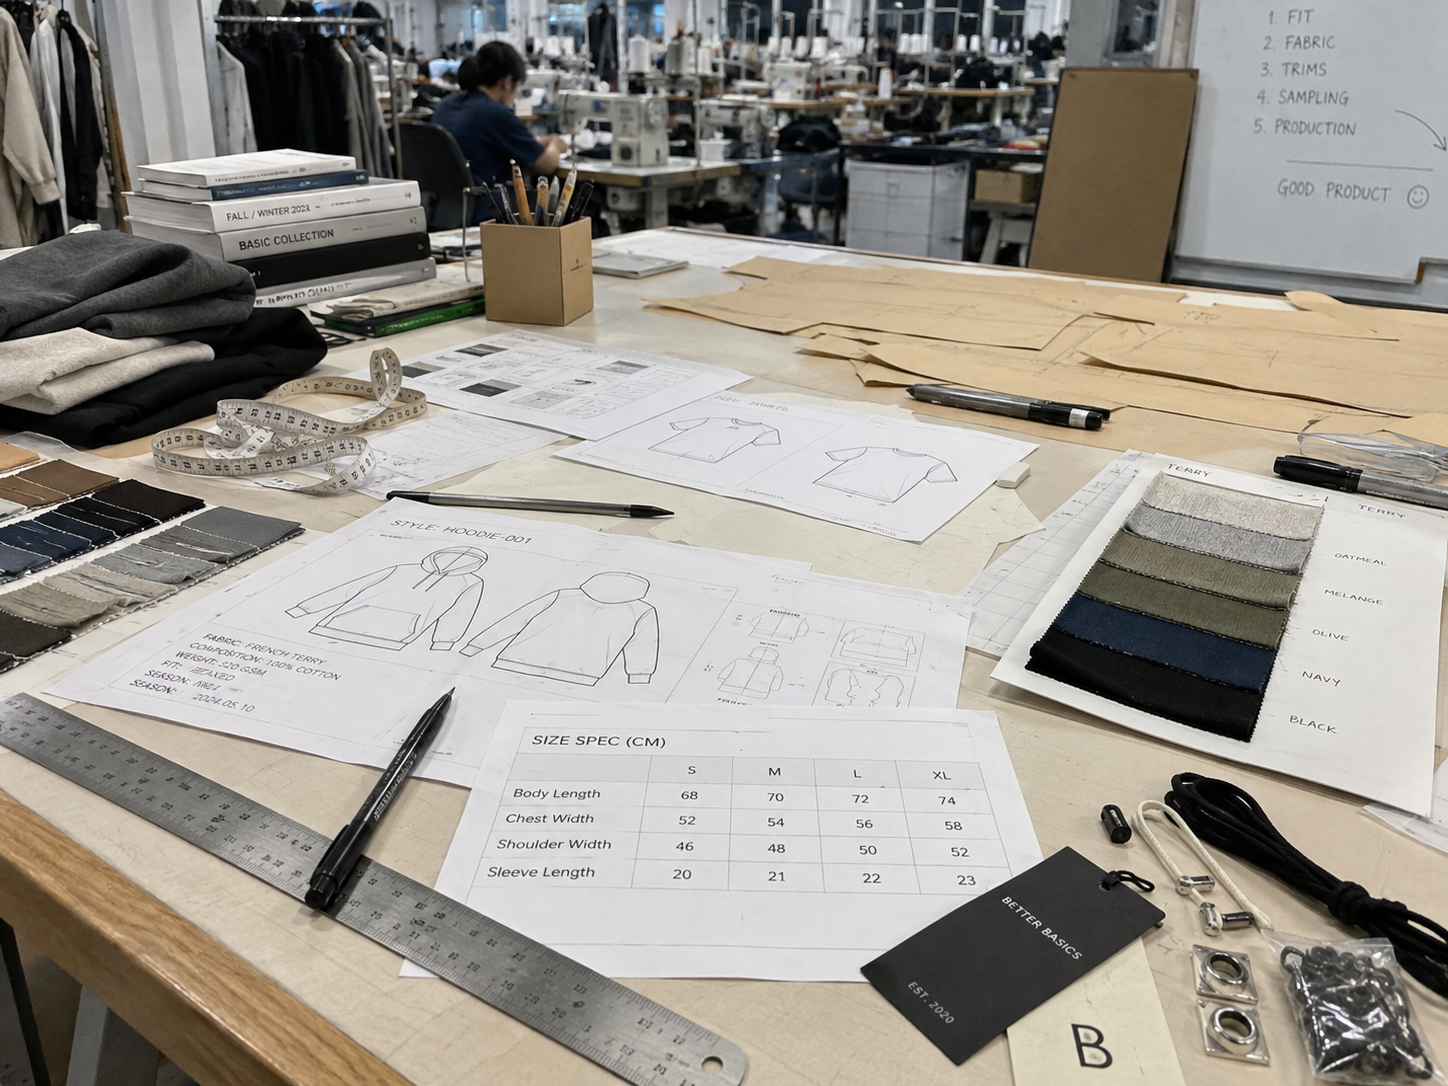
A startup brand may have a strong clothing idea but still struggle to explain it to a factory. A reference photo and a logo are rarely enough. If important details are missing, the factory must guess. Those guesses can lead to wrong samples, extra costs, and weeks of unnecessary revisions.
To prepare a tech pack for clothing OEM production, I recommend including clear front and back sketches, a size chart, garment measurements, fabric composition and GSM, Pantone colors, construction details, artwork dimensions, logo placement, labels, trims, packaging, and measurement tolerances. A good tech pack tells the factory exactly what to make without relying on assumptions.
I have received very detailed tech packs and I have also received one screenshot with the message, “Make it exactly like this.” Both can start a conversation, but they do not create the same result. For a startup brand, a clear tech pack is one of the easiest ways to make the first sample faster and more accurate.
Table of Contents
- What Is a Clothing Tech Pack?
- Why Does a Startup Brand Need a Tech Pack for OEM Production?
- What Information Should a Clothing Tech Pack Include?
- How Should You Create the Garment Design Page?
- How Do You Prepare a Useful Size Chart and Measurement Sheet?
- How Should You Specify Fabric and GSM?
- How Should Logos, Prints, and Embroidery Be Shown?
- What Construction Details Should Be Included?
- How Should Labels, Trims, and Packaging Be Specified?
- What Are Measurement Tolerances and Why Do They Matter?
- Does a Startup Need a Professional Designer to Make a Tech Pack?
- What Mistakes Do Startup Brands Make in Tech Packs?
- How Detailed Should a First Tech Pack Really Be?
- What Should You Send to a Clothing Factory With the Tech Pack?
- Conclusion
- Footnotes & References
What Is a Clothing Tech Pack?
I often describe a tech pack as the instruction manual for a garment. It translates a creative design into information that a pattern maker, sample maker, printing supplier, embroidery supplier, and production team can actually use.
A clothing tech pack is a technical document that explains how a garment should be made. It normally includes design drawings, measurements, fabric specifications, colors, construction details, artwork, trims, labels, and packaging requirements. In OEM manufacturing, the tech pack becomes one of the main references used for sampling, costing, production, and quality control.
A tech pack does not need to look beautiful.
It needs to be clear.
That is an important difference.
I would rather receive a simple PDF with correct measurements and clear notes than a beautiful presentation that leaves important production details unanswered.
A Tech Pack Connects Design and Production
A designer may think:
I want a heavyweight oversized hoodie with a vintage feel.
A factory needs more information:
- How heavy is “heavyweight”?
- How oversized should it be?
- What fabric composition?
- French terry or fleece?
- What shoulder width?
- What body length?
- What wash creates the vintage effect?
- Is the hood single or double layer?
- What rib should be used?
- What size is the logo?
The tech pack turns an idea into answers.
Why Does a Startup Brand Need a Tech Pack for OEM Production?
Large brands usually have product developers, designers, technical designers, and sourcing teams. Startup brands often have one founder doing all of those jobs.
That makes a clear document even more useful.
A startup brand needs a tech pack because OEM manufacturing depends on the buyer's specifications. A clear tech pack reduces factory assumptions, improves quotation accuracy, shortens sample revisions, and creates a written standard for bulk production. It also helps the brand compare different manufacturers using the same product requirements instead of comparing different interpretations of the design.
This last point is especially important.
Imagine sending the same message to three factories:
I need a premium oversized black hoodie.
Factory A may quote 320 GSM fleece.
Factory B may quote 400 GSM French terry.
Factory C may quote 500 GSM fleece.
Now the three prices cannot really be compared.
The factories are quoting three different products.
A Tech Pack Makes Quotations More Useful
If I receive this instead:
100% cotton
450 GSM French terry
Oversized fit
Double-layer hood
2×2 cotton rib
Small chest embroidery
32 cm back screen print
Custom woven neck label
Individual polybag
I can give a much more meaningful quotation.
The same applies to another manufacturer.
Now the startup can compare suppliers more fairly.
What Information Should a Clothing Tech Pack Include?
A good tech pack does not need hundreds of pages. It needs the information that affects how the garment is made.
A useful clothing tech pack should include garment sketches, style information, measurements, grading or size specifications, fabric composition, GSM, colors, construction notes, stitch details, artwork files, print or embroidery dimensions, trims, labels, packaging, and tolerances. It should also clearly identify the sample size and any details that are still under development.
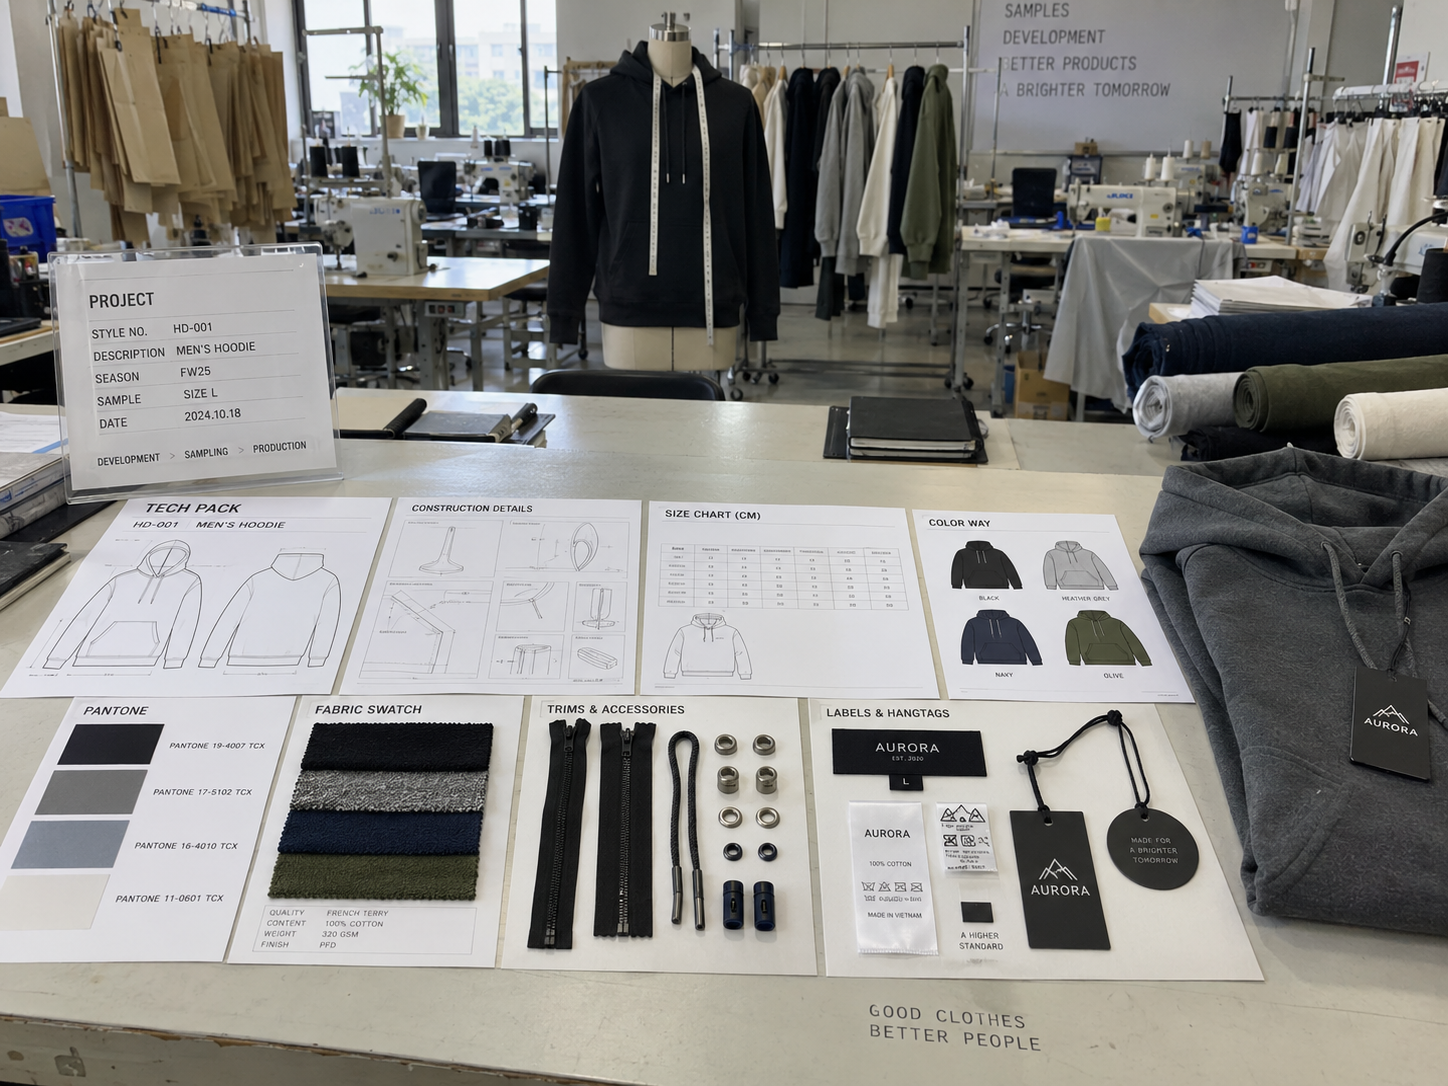
I normally want to see the following sections.
| Tech Pack Section | What It Should Explain |
|---|---|
| Style overview | Product name, style number, season |
| Flat sketches | Front, back, side, special details |
| Measurement chart | Finished garment measurements |
| Fabric | Composition, GSM, structure, finish |
| Color | Pantone or other clear references |
| Construction | Seams, stitching, panels, pockets |
| Artwork | Logo size, location, technique |
| Trims | Zippers, buttons, drawcords, elastic |
| Labels | Neck label, size label, care label |
| Packaging | Polybag, box, hangtag, stickers |
| Tolerance | Acceptable measurement variation |
| Notes | Special requirements or warnings |
For a startup, I would focus on getting these fundamentals right before trying to create an extremely complicated document.
How Should You Create the Garment Design Page?
The design page should give me a clear visual understanding of the garment.
A garment design page should include clean front and back flat drawings with all important design features visible. Add side views or close-up detail drawings when necessary. Use arrows or callouts to identify pockets, seams, panels, zippers, rib sections, drawcords, logos, and other features that could be misunderstood from the main sketch.
A flat sketch is different from a fashion illustration.
I do not need a model pose.
I need to see the construction.
What Should Be Visible in the Flat Sketch?
For a hoodie, I may need to see:
- Hood shape
- Shoulder position
- Sleeve shape
- Cuff construction
- Kangaroo pocket
- Side seams
- Waist rib
- Drawcord
- Eyelets
- Front logo
- Back logo
For sweatpants, I may need:
- Waistband
- Drawcord
- Side pockets
- Back pocket
- Rise
- Leg shape
- Cuff or open hem
- Logo placement
If something is unusual, add a close-up.
Reference Photos Can Help
I like reference photos when they explain a specific feature.
For example:
Pocket construction should look like this.
Hood shape should follow this reference.
We want this type of vintage wash.
That is useful.
The problem starts when a buyer sends ten different reference photos and expects the factory to decide which details to combine.
If one photo shows the fit, another shows the wash, and another shows the pocket, label them clearly.
How Do You Prepare a Useful Size Chart and Measurement Sheet?
Measurements are one of the most important parts of the tech pack.
A design can look perfect on paper and still fit badly if the measurements are wrong.
A useful clothing measurement sheet should list each measurement point, explain where it is measured, provide values for each size, and identify the base sample size. Common points include chest width, body length, shoulder width, sleeve length, waist, hip, rise, inseam, and leg opening. Diagrams should be added when the measurement method could be unclear.
Do Not Only Write S, M, L, XL
Sizes are labels.
Measurements define the actual garment.
Two brands can both sell a size Large hoodie but have completely different measurements.
For a hoodie, a basic chart might look like this:
| Measurement | S | M | L | XL |
|---|---|---|---|---|
| Chest width | 58 cm | 60 cm | 62 cm | 64 cm |
| Body length | 68 cm | 70 cm | 72 cm | 74 cm |
| Shoulder width | 56 cm | 58 cm | 60 cm | 62 cm |
| Sleeve length | 57 cm | 58 cm | 59 cm | 60 cm |
| Bottom width | 48 cm | 50 cm | 52 cm | 54 cm |
These numbers are only an example.
The important part is the structure.
Show How the Garment Is Measured
“Chest” can create confusion.
Does it mean full circumference?
Does it mean half chest measured flat?
Where exactly should the tape sit?
I prefer diagrams that mark point A to point B.
This becomes very important during sample checking and bulk inspection.
Start with One Base Size if Necessary
A startup does not always need perfect grading for every size before the first sample.
If the founder has a strong reference garment, we can sometimes start with one base size.
For example:
First sample: size L.
We confirm the fit.
Then the final grading can be developed after approval.
This can be safer than guessing five sizes before the base fit is correct.
How Should You Specify Fabric and GSM?
Fabric descriptions are often too vague in startup tech packs.
Words like “premium cotton,” “soft fabric,” or “heavy fabric” are not enough for production.
A fabric specification should state the fiber composition, fabric type, approximate GSM, stretch requirement, surface finish, and any special treatment. For example, “100% cotton, 420 GSM French terry, enzyme washed” gives a factory much more useful information than “premium heavyweight cotton.”
Include the Main Fabric Details
I normally look for:
- Composition
- GSM
- Knit structure
- Stretch
- Finish
- Color
- Wash
- Hand feel requirements
For example:
100% cotton
400 GSM
French terry
Non-stretch body fabric
Enzyme wash
Soft hand feel
Pantone 19-4006 TCX
For textile color communication, it helps to use the correct Pantone system. Pantone's official Fashion, Home + Interiors color system[^1] identifies TCX as the format used for soft surfaces such as textiles and apparel.
Now I know what I should source.
Understand That GSM Is Not Everything
Two fabrics can both be 400 GSM and still feel very different.
One may be stiff.
One may be soft.
One may have compact yarn.
One may have a loose structure.
One may shrink more after washing.
That is why I like buyers to include a fabric reference or explain the desired hand feel.
If possible, sending a physical reference garment can be even better.
If a buyer also has a specific chemical-safety or certification requirement, it should be stated in the tech pack rather than introduced after fabric sourcing begins. For example, OEKO-TEX® STANDARD 100[^2] tests textiles and components for harmful substances and uses different product classes based on intended use.
How Should Logos, Prints, and Embroidery Be Shown?
Logo instructions need exact dimensions.
“Small chest logo” is not enough.
Every print or embroidery in a tech pack should show the artwork, production technique, exact dimensions, color, and placement measurement. Buyers should specify the distance from reference points such as the neckline, center front, side seam, or pocket. Vector artwork should also be supplied separately whenever possible.
Give Me Numbers, Not Only Visual Proportions
A useful instruction looks like this:
Front embroidery: 8 cm wide
Centered on left chest
10 cm below shoulder seam
Black embroidery thread
A weak instruction looks like this:
Put the logo around here.
The second instruction forces the factory to guess.
Specify the Decoration Method
The same artwork can look completely different depending on the method.
Common options include:
- Screen printing
- DTG
- DTF
- Embroidery
- Puff print
- Appliqué
- Chenille embroidery
- Silicone print
- Heat transfer
If the buyer does not know which process to use, I can recommend one.
But the final tech pack should record the approved method.
Send Vector Files
I prefer:
- AI
- EPS
- SVG
- Vector PDF
Adobe's official Illustrator supported file formats documentation[^3] confirms support for formats including AI, PDF, EPS, and SVG, which are commonly useful when artwork needs to remain editable or scalable during development.
A clear PNG may work for some digital printing.
A screenshot from Instagram is not ideal for production.
Poor artwork can delay sampling because somebody has to recreate it first.
What Construction Details Should Be Included?
Construction notes tell the sample maker how the garment should be assembled.
Construction details should explain seams, stitch types, topstitching, panels, pockets, hood layers, rib construction, seam finishing, reinforcement, and any special sewing methods. Startups do not need to know every technical sewing term, but unusual details should be shown clearly with drawings, reference photos, or simple written instructions.
Focus on Details That Change the Product
For a standard T-shirt, I may already understand normal construction.
You do not need to explain every stitch.
But if you want:
- Double-needle topstitching
- Raw-edge seams
- Contrast stitching
- Hidden side pockets
- Reinforced shoulder tape
- Special panel lines
- Double-layer hood
- No drawcord
- Extra-wide rib cuffs
those details should be written down.
Do Not Assume a Reference Photo Is Enough
A photo shows appearance.
It does not always show construction.
A hidden pocket may look simple from the outside but need a very specific internal structure.
If the detail matters, explain it.
How Should Labels, Trims, and Packaging Be Specified?
Small accessories can create big delays if they are left until the end.
A tech pack should identify every required label, trim, and packaging component. This includes woven neck labels, size labels, care labels, hangtags, zippers, buttons, eyelets, drawcords, elastic, polybags, stickers, and boxes. Each custom item should include dimensions, colors, artwork, materials, and placement where possible.
A trim sheet might look like this:
| Item | Specification |
|---|---|
| Main zipper | YKK #5 metal zipper, gunmetal |
| Drawcord | 10 mm flat cotton cord, black |
| Eyelet | 8 mm metal, gunmetal |
| Neck label | Woven, 60 × 20 mm |
| Size label | Woven, black/white |
| Care label | Printed satin |
| Hangtag | Custom logo, 350 GSM card |
| Packaging | Individual clear polybag |
If a branded zipper is specified, I recommend giving the factory more information than only the brand name. YKK's official fastening product search[^4] includes metal, coil and VISLON® zippers, different slider types, finishes, buttons, snaps, plastic hardware and other options. That is why specifications such as zipper type, size, finish and puller matter.
Understand Supplier Minimums
A startup may order 50 hoodies.
The garment factory may accept that.
But the woven label supplier may require 100 labels.
The hangtag supplier may require 500 pieces.
A custom zipper pull may need a mold.
This does not mean the factory is trying to force a larger garment order.
Different supply-chain partners have different minimum quantities.
I like to identify these items early because they affect both price and timeline.
Do Not Forget Market Labeling Requirements
For brands selling in the United States, labels are not only a branding decision.
The U.S. Federal Trade Commission's Textile Fiber Rule[^5] requires covered textile products to disclose information including fiber content, the responsible manufacturer or marketer, and country of origin.
The FTC's Care Labeling Rule[^6] also requires manufacturers and importers of covered textile apparel to provide appropriate care instructions.
If the target market has specific labeling requirements, I prefer to identify them before the care label artwork is finalized.
What Are Measurement Tolerances and Why Do They Matter?
Clothing production is not machining. A finished garment cannot always match every measurement to the exact millimeter.
Measurement tolerance is the acceptable difference between the tech pack specification and the finished garment. For many knit garments, a tolerance may be around ±1 cm to ±2 cm depending on the measurement point, fabric, washing process, and garment construction. The tech pack should define realistic tolerances so both buyer and factory use the same quality standard.
For example:
| Measurement Point | Target | Tolerance |
|---|---|---|
| Chest width | 62 cm | ±1 cm |
| Body length | 72 cm | ±1 cm |
| Sleeve length | 59 cm | ±1 cm |
| Bottom width | 52 cm | ±1 cm |
| Garment-washed length | 72 cm | ±1.5 cm |
Why Zero Tolerance Is Not Realistic
Fabric moves.
Knit fabric stretches.
Sewing changes dimensions.
Washing creates shrinkage.
Two garments produced correctly can still differ slightly.
That is why professional quality control works with tolerance ranges.
The key is deciding what variation is acceptable before production starts.
Does a Startup Need a Professional Designer to Make a Tech Pack?
Not always.
I have worked with founders who created useful production documents without being trained fashion designers.
A startup does not always need a professional technical designer for the first tech pack. A founder can create a workable document using clear sketches, measurements, reference photos, fabric specifications, and written notes. However, professional technical design support becomes more valuable when the garment has complex construction, precise fit, extensive grading, or unusual performance requirements.
If your product is a basic oversized T-shirt, sweatshirt, or hoodie, you may be able to prepare most of the information yourself.
If your product is a technical compression garment or complex jacket, expert help can save a lot of mistakes.
What I Need More Than Perfect Terminology
I do not expect every startup founder to know technical sewing vocabulary.
If you do not know the name of a seam, show me a clear picture.
If you do not know the technical name of a pocket, draw it.
If you do not know exactly which fabric is best, tell me:
I want something similar to this reference. It should feel dense, soft, and around 450 GSM.
We can work from there.
Clarity matters more than pretending to know a term.
What Mistakes Do Startup Brands Make in Tech Packs?
Most problems I see are not caused by complicated technical issues. They come from missing or conflicting information.
Common tech pack mistakes include missing measurements, unclear fabric descriptions, no GSM, artwork without dimensions, inconsistent colors, copied size charts, conflicting notes, missing label information, and using different reference garments for different details without explaining them. These mistakes force the factory to make assumptions and often create extra sample rounds.
1. Copying a Random Size Chart
I see this often.
A startup finds a hoodie size chart online and adds it to the tech pack.
But the design is supposed to be oversized while the measurements are regular fit.
The visual design and size chart now disagree.
Start with the fit you actually want.
2. Using Words Instead of Specifications
Examples include:
- Heavyweight
- Premium
- Luxury cotton
- Big logo
- Oversized
- Soft
- High quality
These words describe direction.
They do not define production.
Add numbers and references.
3. Changing Instructions Across Different Messages
The tech pack says the logo is 25 cm.
An email says 30 cm.
A WhatsApp message says “make it slightly bigger.”
Which one should production follow?
I always prefer one updated master document.
4. Forgetting the Back or Side View
A startup may spend all its time designing the front.
Then the factory has to ask:
- Is there a back seam?
- Is the logo centered?
- Does the pocket wrap around?
- Are there side panels?
Show every important view.
5. Trying to Finalize Everything Before Testing the Fit
A startup sometimes spends a lot of money developing custom packaging, trims, and labels before checking whether the garment fits correctly.
I usually prefer to solve the product first.
Branding details can be finalized while the fit is being approved.
How Detailed Should a First Tech Pack Really Be?
I do not think a startup needs to make a 40-page document for a basic hoodie.
A first tech pack should be detailed enough that the factory can quote the product, source the right materials, create the pattern, and make the first sample with minimal guessing. It does not need to include every final bulk-production detail if some decisions will only be made after the first fit sample.
I like to separate information into three levels.
Must Be Confirmed Before Sampling
These usually include:
- Product type
- Sample size
- Main measurements
- Fabric type
- Approximate GSM
- Main color
- Main construction
- Logo technique
- Logo dimensions
Can Sometimes Be Confirmed During Sampling
These may include:
- Small fit adjustments
- Exact rib tension
- Minor stitch changes
- Final logo position
- Small trim changes
Can Often Wait Until Before Bulk Production
Depending on the project:
- Final packaging quantity
- Carton marks
- Complete size grading
- Some hangtag details
- Shipping marks
This approach keeps development moving without leaving critical decisions to chance.
What Should You Send to a Clothing Factory With the Tech Pack?
The tech pack is the main document, but a few supporting files make development much easier.
When sending a tech pack to an OEM clothing factory, I recommend including vector logo files, reference photos, fabric references if available, Pantone codes, your expected sample size, estimated bulk quantity, target market, shipping destination, and any physical reference garment you want the factory to copy or improve.
A complete first inquiry may contain:
- Tech pack PDF
- AI or vector logo files
- Reference images
- Estimated order quantity
- Sample size
- Target delivery date
- Destination country
- Physical sample information if applicable
Tell the Factory Your Expected Quantity
This matters earlier than many startups realize.
A garment made for 50 pieces may use a different sourcing plan from a garment made for 5,000 pieces.
If I know the target volume, I can check whether the fabric, trim, and decoration methods make commercial sense.
Tell the Factory What Is Still Flexible
This can save time.
For example:
The body measurements are fixed, but I am open to your fabric recommendation between 400 and 450 GSM.
Or:
The design must stay the same, but the zipper brand is flexible.
Now I know where I can help solve problems without changing the core product.
Treat the Tech Pack as a Living Document
One thing I learned from sample development is that the first version is rarely the final version.
The first sample may show that the sleeve needs to be shorter.
The embroidery may need to move higher.
The fabric may feel too stiff.
That is normal development.
The important thing is to update the tech pack after each approved change.
If the approved sample says one thing and the final tech pack says another, bulk production becomes risky.
For me, the best tech pack is not the one that looks the most professional.
It is the one that stays accurate.
Conclusion
A good OEM tech pack gives the factory clear instructions on design, measurements, fabric, construction, artwork, trims, labels, tolerances, and packaging.
Startup brands do not need to know every technical term before contacting a manufacturer. What matters more is removing as much guesswork as possible.
If you know the measurement, write the measurement.
If you know the fabric composition and GSM, include them.
If a logo position matters, give the factory dimensions instead of saying “around here.”
If you are unsure about a technical detail, clearly identify what is fixed and what the factory can recommend.
I also recommend treating the tech pack as a living production document rather than something that is finished once and never touched again. When the sample changes, update the tech pack. When a fabric is approved, update it. When the logo position moves, record the new position.
By the time bulk production starts, the factory, buyer, pattern maker, sample room, printing supplier, embroidery supplier, and QC team should all be working from the same information.
That is what makes a tech pack valuable.
It is not about creating the most complicated document.
It is about creating one clear source of truth for the garment.
Footnotes & References
[^1]: Pantone — Fashion, Home + Interiors (FHI). Official Pantone color system explaining the use of TCX for soft surfaces including textiles and apparel.
https://www.pantone.com/na/en-us/fashion-home-interiors
[^2]: OEKO-TEX® — STANDARD 100. Official information on testing textile products and components for harmful substances and the STANDARD 100 product-class system.
https://www.oeko-tex.com/en/our-standards/oeko-tex-standard-100
[^3]: Adobe — Supported File Formats in Illustrator. Official Adobe documentation for AI, PDF, EPS, SVG, and other artwork formats supported by Illustrator.
https://helpx.adobe.com/illustrator/desktop/get-started/learn-the-basics/supported-file-formats.html
[^4]: YKK Fastening Products Group — Product Search. Official YKK database covering zippers, sliders, plastic hardware, snaps, buttons, and other fastening products.
https://www.ykkfastening.com/products/search/?cl=on
[^5]: U.S. Federal Trade Commission — Textile Fiber Rule. Official U.S. requirements covering disclosure of textile fiber content, responsible business identity, and country of origin for covered textile products.
https://www.ftc.gov/legal-library/browse/rules/textile-fiber-rule
[^6]: U.S. Federal Trade Commission — Care Labeling Rule. Official U.S. requirements concerning care instructions for covered textile wearing apparel and certain textile goods.
https://www.ftc.gov/legal-library/browse/rules/care-labeling-textile-wearing-apparel-certain-piece-goods